VISITview Controls
VISITview comes up with a Big Red Pointer being shown on the screen. You move this pointer by positioning your mouse pointer to a different location in the window and clicking it. When you do this, a message is sent to the VISITview server which then tells the software for all the students to move the Big Red Pointer. Therefore, you will see a slight time delay in actually repositioning the pointer after you click your mouse button.
If you want to practice using these controls while reading this page, you can
click here to open (in a different window) a sample lesson you
can experiment with.
Bernard Meisner (NWS Southern Region SSD) has put together a printable (so you can tape it on your monitor!) VISITview Controls Quick Reference Card as a PowerPoint PPT file that shows the most common mouse and keyboard options. You can download it here. He suggests printing as a "handout", 2 to a page (hence there are two in the ppt file) in order to get the size right. [You can get a lower-quality, quick preview by clicking here -- but be sure to get the original PPT for printing.]
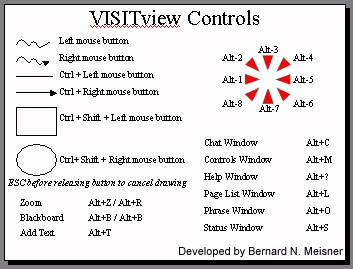
Here's a summary of all the keystrokes and mouse-related buttons:
- Mouse click left button - move the Big Red Pointer to that position for everyone
- Mouse right click and holding SHIFT button - move the Big Red Pointer to that position, but point toward the NE instead of default.
- ALT+1, ALT+2,...,ALT+8 - rotate Big Red Pointer to one of 8 angles. This will remain until another ALT+digit is done. Use Shift+1, etc. on the newer, HTML5-based client
- ALT+0 (zero) - toggle the Big Red Pointer "persistent" mode. When "on", a unique pointer symbol is drawn, and the pointer will not move off its position when you annotate (draw lines, boxes, etc). This mode remains between pages, as well.
- Mouse click right button - show the controls if they were hidden (also ALT+M on the keyboard).
-
Drawing lines and figures.
- Notes:
- mouse drag means hold the mouse button down (usually the left one) and move the mouse pointer around.
- if while drawing any of these figures, you tap the ESC key while still holding the mouse button down, the process will be stopped and nothing will be sent when you then release the mouse button.
Controls for older, Java applet client:
- Mouse drag with left button depressed - draw a free-hand line on the screen; when you release the button, the line will be drawn on everyone's screen
- Mouse drag with right button depressed - draw a free-hand line on the screen; when you release the button, an arrow head will be appended and the line will be drawn on everyone's screen
- Mouse drag with left button depressed and holding CTRL key will draw a straight line on the screen
- Mouse drag with right button depressed and holding CTRL key will draw a straight line on the screen; when you release the button, an arrow head will be appened and the line will be drawn on everyone's screen.
- Mouse drag with left button depressed and holding both CTRL and SHIFT keys will draw a rectangle on the screen. The rectangle will appear on everyone's screen when you release the mouse button.
- Mouse drag with right button depressed and holding both CTRL and SHIFT keys will draw a circle on the screen, which expands from the initial point outward as you drag the pointer away from the center. The circle will appear on everyone's screen when you release the mouse button.
- Mouse drag with left button depressed and holding SHIFT key will "roam" around in a portal; when you release the button, the Pointer will be moved to that position on eveyone's screen. This is has effect other than pointer repositioning if portals are not being used
Controls for newer, web browser HTML5 client:
Drawing mode is set using a dropdown widget in the Graphics section, as shown in the image below. Select a mode and drag the mouse.

- Notes:
- ALT+Z - zoom the window by one factor so as to leave the Big Red Pointer is the same location on the screen (may be done repeatedly)
- ALT+R - unzoom the window
- ALT+C - open a "chat window" that allows site-to-site communications by typing messages
- ALT+T - to make a text string on the screen. Move the text by moving the pointer; pick a different color if you like. Type in the phrase (you may use the backspace key to erase. Hit Enter or click the right mouse button to send the text to everyone. Or press ESC to abandon this. To change the font size (default is 12), begin your annotation string with a valid font size in square brackets. For example, "[16] Test String" will put the words "Test String" on the screen with a 16pt font size.
- ALT+O - open a "phrase window" that allows the instructor to pick pre-defined phrases, and then goes in to ALT+T mode using the selected phrase.
- ALT+M - show the controls if they were hidden (also right-mouse-click).
- ALT+L - bring up an independent "page list window" on it; clicking on a page in this list loades the page.
- ALT+S - bring up an independent "status window" which shows the status of all users in this group. This is only available to the Master session, and should be used only by the one instructor during a session. More details about the Status Window content are here.
- ALT+B - turn the viewing screen into a blackboard. All annotation capabilities remain the same. ALT+B again will restore the previous page display. (There is also a bb key on the control panel for this.)
- ALT+? - bring up a Help Window with all this info on it. Press any keyboard key to remove the Help Window.
Animation and frame selection controls
Below the image/viewing window, you'll find that the VISITview controls are arranged in three groups. From right to left, the first group (common to both students and master) is used to control what frame is being viewed on this page of the lesson, and how it is being shown.
Please note that these controls affect everyone in the session! In the example shown, note that the word "Fade" is diminished in intensity. This means that for the page of the lesson being viewed, fading is not available.
Drawing controls
The second set of controls is used for annotation (free-hand line drawing), to toggle the Blackboard on and off, and to launch the browser (when the instructor has linked a web page to this page of the lesson).
In order to draw, first select the color you want, and then drag the mouse (that is, move the mouse pointer while holding the left button down). As you drag the mouse around, a line will be drawn in the color of your choice. As soon as you release the mouse button, the line is transmitted to all others. You will notice that when you let go of the mouse button, the line you've been drawing is erased briefly -- this is the time it takes to send the message to the server and have it resent back to you (and everyone else).
- You may draw a rectangle by simultaneously dragging the mouse while pressing both the Shift and Ctrl keys at the same time.
- You may draw a straight line by simultaneously dragging the mouse while pressing Ctrl key at the same time.
To erase the last line drawn, click "Last" button. To erase all the annotations on this page (drawing and text, click "Erase All" button.
If you want to use the blackboard to draw on, just click the "bb" button.
Page selection and enhancements
The final set of controls are available only to the master session. They control, literally, what page you're on in the lesson. In place of this set of controls, the students will see the label of the current page.
The top choice menu allows you to randomly select a page to show. Note: after you select a page to show from the list presented, you must click on the Selected button in order to activate the loading of the associated images on the students' workstations. The Next and Prev buttons allow you to just step ahead or go back to the adjacent pages in the lesson.
The Stat button will give you an indication of the status of the last load command sent to all the students. In the Applet Status Line (at the bottom of the screen), a message will appear that looks something like this:
Status of load: OK -- OK OK -- OK -- OK
This indicates that of the 8 people connected for this session (including yourself), 3 have not yet finished loading the page you just went to. You should view this especially when using the remote mode, where some or all of the students are getting their images (pages) over the Internet.
The bottom choice box is for enhancements. If you've included the "enhance" tag in the HTML and supplied a text file with the enhancements in it, their names will appear here. You may select any enhancement from the choice list -- as soon as you do, the enhancement will be applied to the image(s) on this page.
If you are an instructor you may also use the ALT+S command to pop up the ViewStatus window that contains information about the state of each participant in the lesson: their machine name, the amount of time (in seconds) since they were last heard from, and the amount of time (in milliseconds) it took to load the last page.
Overlay toggle(s)
Finally, if the instructor has included overlays in the lesson, one or more checkboxes will appear in the control panel for those pages:
To toggle the overlay on and off, just click the checkbox.
Return to VISITview home page.