Time Matching
Time matching is a feature designed to create loops that accommodate data with differing temporal frequencies. An example where time matching would be useful is if a user wants to create a loop of satellite data overlaid with radar data but they have different frequencies (e.g., the satellite data comes in twice an hour while the radar data comes in eight times an hour). In the past, a user would have to use the Absolute Times tab of the radar data and individually select the times closest to those of the satellite data. With time matching, this is no longer necessary. See the example image below:
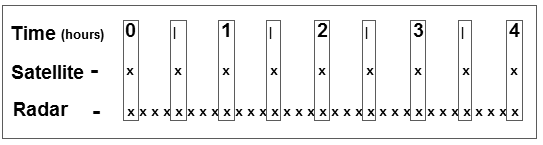 Image 1: Time Matching Example
The example above shows the temporal frequency that satellite and radar images come in (each image is marked by an 'x'). In this example, the satellite data is set as the driver, and radar data is set to match the driver. When using time matching, McIDAS-V will look at the time of each satellite image and pick out the radar image with a time closest to that of the satellite image. This radar time may be earlier or later than the satellite time. In this example, only the satellite and radar times contained in the rectangles are used in the display. Therefore, every satellite image is displayed, but only every fourth radar image is displayed.
Time matching can be used with a variety of types of data, including satellite, radar, grid, and point data. In general, the item with the lowest temporal frequency will be set as the "time driver", while other items will be set to match the times of the driver.
The time driver can also be set in the Time Animation Widget. There is an option in the Define Animation Times tab called Set as Time Driver. This feature allows a user to set a block of times to be a driver before loading any data. For example, a time animation over the last 5 hours in 30 minute increments can be set as the driver, and layers chosen to match time driver times will match the Time Animation Widget times.
Multiple time drivers can be used in the same session, and each time driver is only the driver for the panel that the layer is displayed in. Therefore, with a multi-panel display, if a time driver is set in panel 1, only layers displayed in panel 1 will be able to match the time driver. If a layer is displayed in panel 2 using the Match Time Driver in the Times tab of the Field Selector, then there will be an error since no time driver is set in that panel. However, each panel is capable of having a time driver set for it.
Terminology
- Time Driver - Sets the times that will be used in the display. This is generally the item with the lowest temporal frequency. The time driver must be set in order to use time matching. A layer can be set to be a time driver in the Field Selector tab or in the Layer Controls tab of the Data Explorer.
- Match Time Driver - Follows the times set by the time driver. This is generally an item with a higher temporal frequency than the time driver. McIDAS-V will select the times of these items to use in the loop based on the time steps of the time driver. In general, a layer can be set to match the time driver in the Data Sources, Field Selector, or Layer Controls tab of the Data Explorer.
Methods of Setting the Time Driver
- Field Selector - In the Times tab of the Field Selector, use the dropdown menu to choose Set As Time Driver. Once Create Display is clicked, the data will display, and this field will now be set as the time driver.
- Layer Controls - If the Field Selector method above wasn't used, after creating the display, use the View->Times->Drive Times with this Display menu item in the Layer Controls. After this option is chosen, the layer will be set as the time driver. If setting a CSV file as the time driver, the Layer Controls menu item is the only way to do so.
- Time Animation Widget - The previous two methods set an individual layer to be the time driver. As an alternative, a block of times can be set as the time driver in the Time Animation Widget using the Set as Time Driver option.
Methods of Matching the Time Driver
- Note that it is only possible to match time driver times if a time driver has already been set in the session. Most data sources that support time matching have the options listed below. However, not all data sources have the option of matching the time driver in all three tabs. For example, with the Gridded Data data source, there is no option to match time driver times in the Data Sources tab of the Data Explorer.
- Data Sources - In the Data Sources tab of the Data Explorer, at the bottom of the Times panel, choose the Match Time Driver checkbox. This will gray-out the Times panel, and clicking Add Source will add times for the layer that are closest to the time driver times.
- Field Selector - If the Data Sources method above wasn't used, in the Times tab of the Field Selector, use the dropdown menu to choose Match Time Driver. Once Create Display is clicked, the only times of data that will display are those that match closest to the time driver times.
- Layer Controls - If the Data Sources or Field Selector methods above weren't used, after creating the display use the View->Times->Uses Time Driver Times menu item in the Layer Controls. After this option is chosen, the data must be reloaded. To do this, use the File->Reload Data menu item in the Layer Controls. Once this is done, the data will reload, and only use the times that match closest to the time driver times. If setting a CSV file to match the time driver, the Layer Controls menu item is the only way to do so.