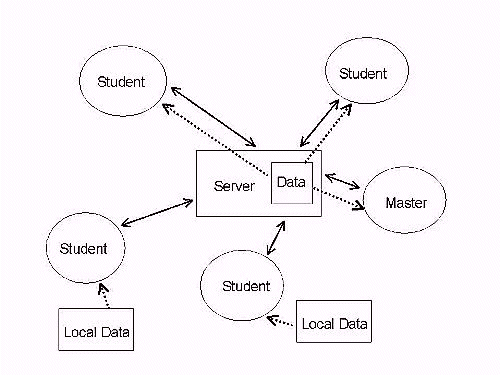
Solid arrows indicate the flow of commands; dashed arrows
indicate the flow of data
All commands to the software during a training session are sent via the Internet by having a single node on the Internet act as a server. Because of Internet security considerations, if the lesson is being taught in browser mode to any of the students (that is, they are using a Web browser and downloading the image files during the lesson...as opposed to running in a pre-loaded mode where they downloaded the image files ahead of time and are using them off their local disk), then the VISITview server must be running on the same machine from which the students are getting their files (html and image). In the pre-loaded mode, the VISITview server may be located on any machine.
The topology looks like the following picture. Note that data (images) may live on the central VISITview Server or they may reside on individual's harddrives. When the image data has been pre-loaded to a local harddrive (as it will be when network communciations is not fast enough), then VISITview must be run as an application and not through a Web Browser. Otherwise, VISITview may be run through a Web Browser and will get all its files from the server.
Solid arrows indicate the flow of commands; dashed arrows
indicate the flow of data
Running a VISITview server is quite simple. If you have downloaded the visitpack.zip file for use in making a particular lesson, then you already have all the code you need (otherwise, make a directory on your machine and dowload visitpack.zip into it...and then just un-zip it). First, be sure that TCP/IP port 1631 is available for connections from the outside world (the VISITview server listens on this port -- see below for details). Then open up an interactive window (in Windows, this would be a DOS Command Prompt) and cd to the directory where you unzipped the visitpack.zip file, and enter the command:
java -cp ./ ViewServer
Note that in older versions of Java, you will use 'jre' instead of 'java'.
If you want to use a TCP port other than 1631, then put that number in the command. For example:
java -cp ./ ViewServer 8302
If you want to have a "splash image" appear on the client sessions before any lesson has started, put the image file in an accessible-to-the-httpd server location, and then append the URL to the command, above. For example:
java -cp ./ ViewServer 1631 http://www.ssec.wisc.edu/visit/serversplash.gif
The server will start up (or complain that another copy is running already). And you are now ready to use VISITview. You will note that a fair amount of text output is produced by the server into the window where you started ViewServer from; this is mainly communications information and can be ignored, or you can pipe it to a file and use this as a complete log.
For sessions that are being run completely in a pre-loaded mode (that is, not through a browser), the server can be on any machine. For NOAA teletraining, we intend to have several machines up all the time with VISITview servers running on them. A list of servers available to NOAA sites is available on this page.
If you have any questions about the use of these machines, please send us email.
Please also refer to this page for important information about using a VISITview server for collaboration activities, and more details about setting up permanent VISITview servers.
You will need to go into the IIS config to the VISITview (lesson) subdirectory. Click on properties > http headers tab > MIME Types > selected NEW > and add an extention of "." (without the quotes) to equal "image/jpg".
Also, in the "Features" view of the VISITview (lesson) subdirectory, double-click "MIME Types" and add one for file extension ".properties" (without the quotes) of type "text/plain".'
Finally, do the same for other non-Windows extensions (such as ".tab" which should be "text/plain") that are used in the directory of the lesson(s), and if you are serving recorded lessons, included extension ".ant" (as "text/plain").
It should then propagate these to the subdirectories and set anything with no extension to be a jpg -- at this time it looks like the key thing here is that the files are images, without respect to the actual encoding method (jpg, rig, png,....).
If you also have audio playback then follow the same steps as above but also add a new MIME type of ".ant" to be of type "text/x-ant+xml".
(Thanks to Dave Watson and Kevin Micke, CIRA, for this information)
The client server protocol is ASCII-based. Plain-text commands are sent from the client to the server where they are re-distributed to all clients in the same group. The commands consist of a command key followed by a colon character. Any parameters that are required then follow. The parameters are blank-separated. Those parameters which contain blanks (for example, a text string to write on the screen) are set off by quotation marks. An example:
LoadPage: 1 013V001 x x x x x '1. koesivu' 'x' x ff x 'x' \n\r
Any command string that is not recognized is discarded.
The VISITview server also requires a handshake initially in a particular sequence or it will not attach the client to the group. For obvious reasons, that handshake is not documented herein.
Return to VISITview home page.