Hatch Actuator Replacement
Tools and Equipment Required
- 10mm socket driver
- Hex driver or Allen key for 1/4″ bolt
- Wrench for 1/4″ nut
- (Depending on setup) Ladder to access top of front-end
Precaution
- The hatch will need to be opened during this procedure, so it’s best done when it’s not raining
- There is very little clearance to remove the actuator on a field-installed AERI, with the instrument hex and inside rain sensor in the way. The inside rain sensor may have to be temporarily removed in order to have space to work on the actuator; alternatively the entire front-end can be temporarily removed to have more clearance and better access
Hatch Actuator Removal Procedure
- Power OFF the instrument
- Remove the front-end panel
- Disconnect the two cables going to the hatch actuator (TRAP M / 1J9, TRAP SW / 1J10)
- (optional, recommended) Remove the front-end to gain better access to the hatch
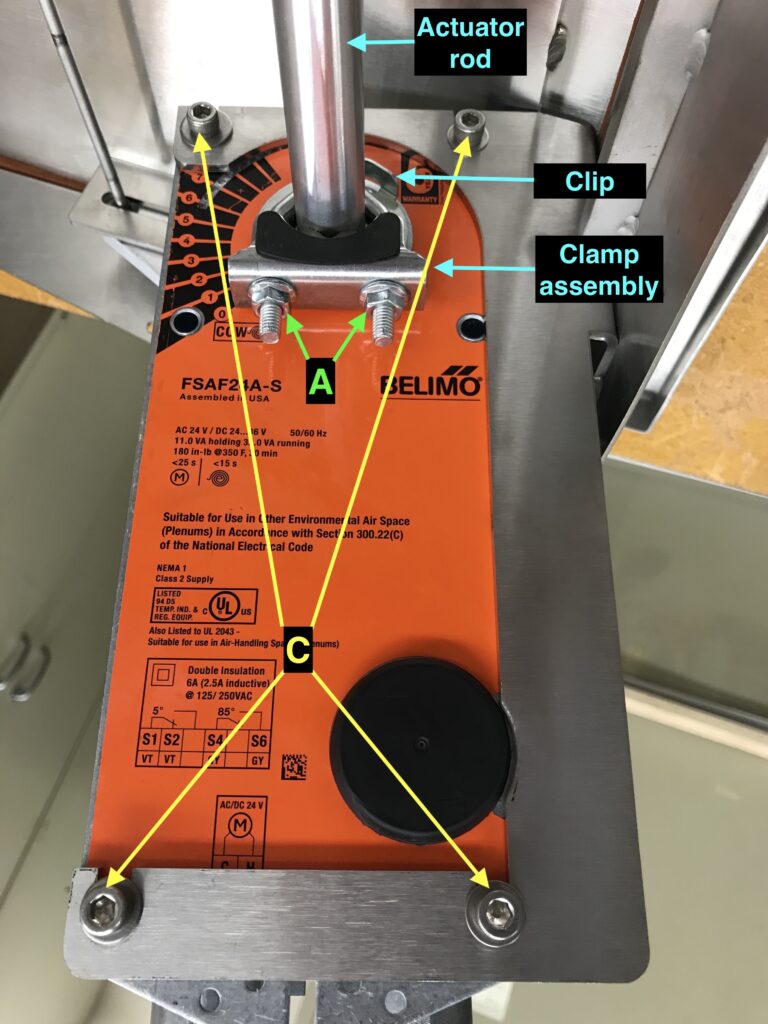
- Loosen the 2x 10mm nuts on the clamp assembly (shown as A in Fig. 1) so the the actuator rod can spin freely, and open the hatch
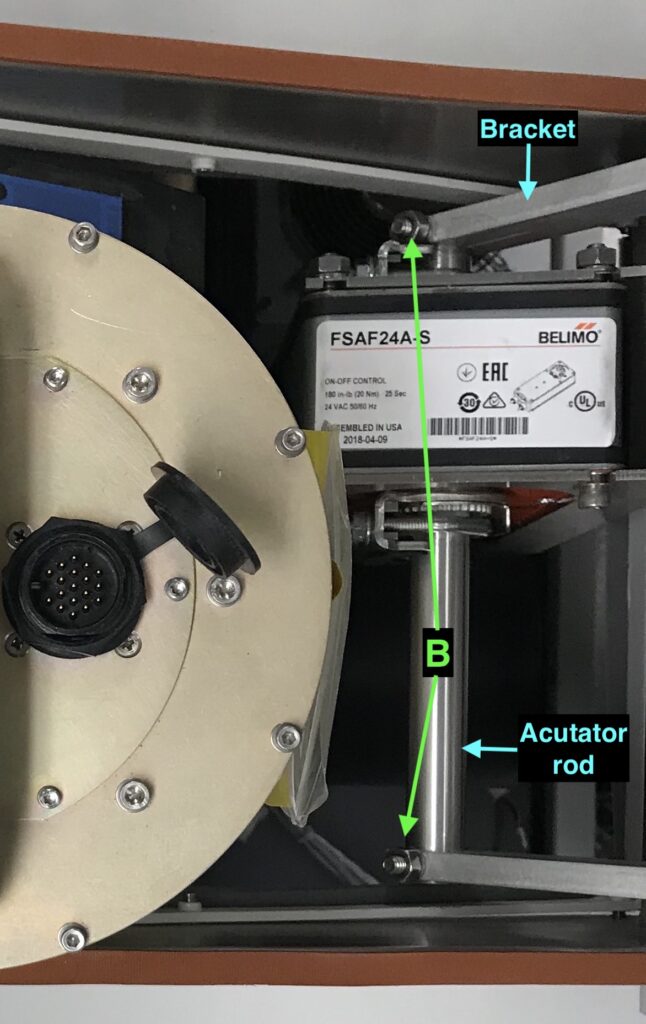
- Remove the 2x 1/4″ bolts connecting the actuator rod and the hatch bracket (shown as B in Fig. 2). Note the configuration of the washers for re-installation
- Slide the hatch brackets off the actuator rod
- Remove the 4x 1/4″ bolts that mount the actuator to the front-end (shown as C in Fig. 1). Note the configuration of the washers for re-installation
- Remove the hatch actuator and rod from the front-end
- Remote the actuator rod, noting the orientation with respect to the actuator for re-installation
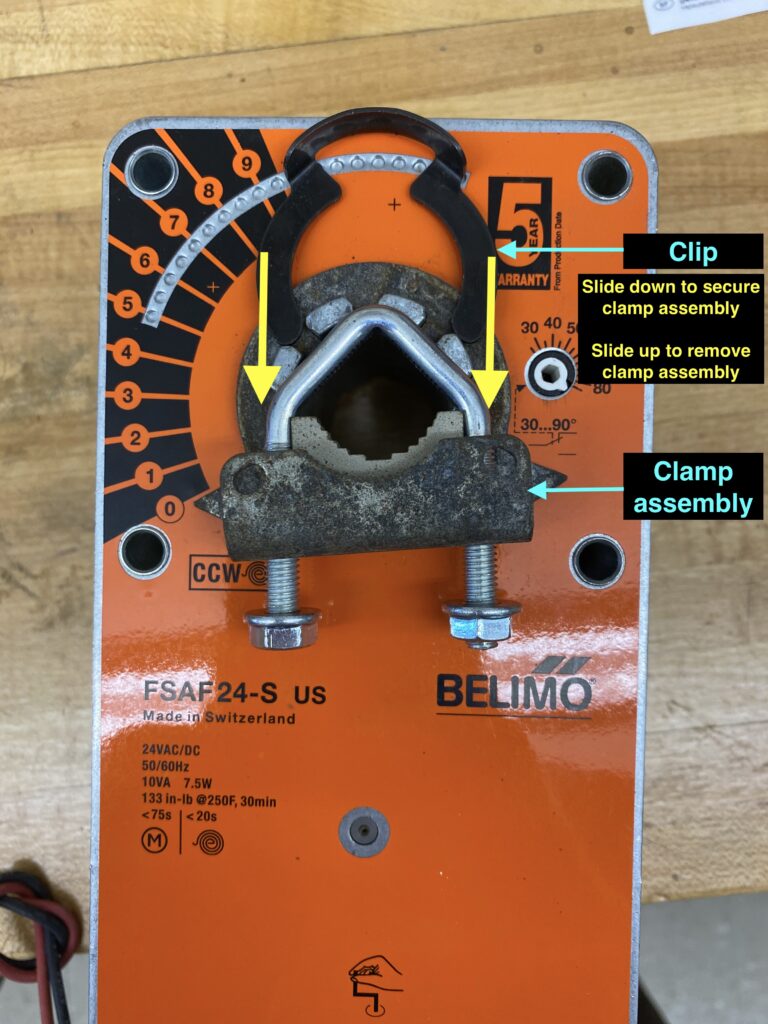
- Remove the clamp assembly. Slide the clip up to remove the assembly from the actuator (see Fig. 3)
Hatch Actuator Installation Procedure
- Install the clamp assembly on the actuator. Orient the assembly so that it’s in the vertical position as shown in Figs. 1 & 3. Slide the clip down to secure the assembly on the actuator (see Fig. 3)
- Place the actuator rod in the actuator. The correct orientation is shown in Figs. 1 & 2. Loosen the nuts on the clamp assembly (shown as A in Fig. 1) if necessary to insert the rod, then tighten the nuts finger tight so that they’re not too loose but the actuator rod can still rotate freely
- Place the hatch actuator in the mount in the front-end in the orientation shown in Figs. 1 & 2
- Secure the hatch actuator using the 4x 1/4″ bolts, washers and lockwashers (shown as C in Fig. 1). Typically there are flat washers on either side and a lock washer on one side.
- Slide the hatch brackets onto the actuator rod. Rotate the rod so that the bolt holes line up
- Install the 2x 1/4″ bolts connecting the actuator rod and the hatch bracket (shown as B in Fig. 2). Typically there’s a flat washer on one side and a lock washer on the other
- Close the hatch
- Press hard down on the hatch while simultaneously tightening the 2x 10mm nuts on the clamp assembly (shown as A in Fig. 1). Pressing down ensures a good seal on the hatch. Alternate tightening the 2x nuts so that the actuator rod gets clamped symmetrically
- Re-install the front-end, if it was removed
- Connect the two cables going to the hatch actuator (TRAP M / 1J9, TRAP SW / 1J10)
- Power ON the instrument
- Use the manual hatch switch on the AERI back-end to confirm operation of the hatch: Set to hatch OPEN, the hatch should open all the way, closeLimitSwitch=0, openLimitSwitch=1 (in FTSW Acquisition tab). Set to hatch CLOSED, the hatch should close all the way, closeLimitSwitch=1, openLimitSwitch=0
- Return the manual hatch switch to the AUTO position. Replace the front-end panel. The instrument can be returned to service.


