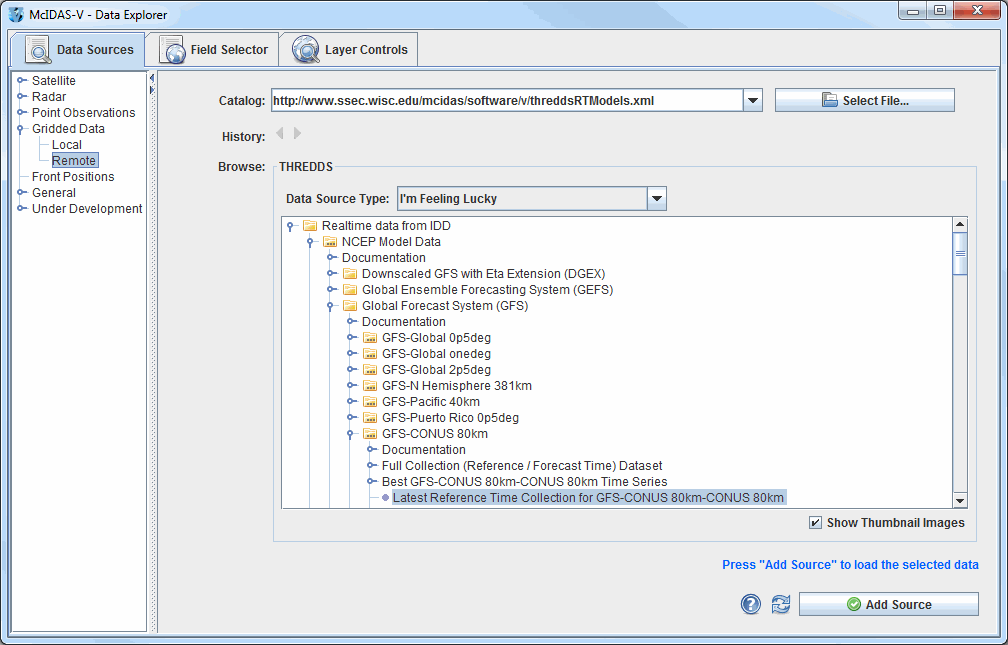
Image 1: Data Sources Tab of the Data Explorer
This section describes how to make displays using gridded data sets. The steps include:
In the Data Explorer window, select the Data Sources tab. On the left side of this tab, select Gridded Data->Remote from the list of available choosers. For more information about the catalog chooser, see Choosing Gridded Data.
Choose one of the remote Catalogs: such as https://www.ssec.wisc.edu/mcidas/software/v/threddsRTModels.xml for Unidata's catalog of near real-time model output.
A tree view of the catalog will be displayed. Open one, such as the NCEP Model Data->Global Forecast System (GFS)->GFS-CONUS 80km->Latest Reference Time Collection, by using the
tab icons ( ).
).
The list of this model's run times appears. Click on one time to select it,
and then click the ![]() button. You have selected
this model run's output to be accessible by McIDAS-V.
button. You have selected
this model run's output to be accessible by McIDAS-V.
The gridded data source that you selected will be shown in the Field
Selector tab of the Data Explorer. The Field Selector tab contains folders
of data categorized as 2D and 3D fields. Click on the 2D grid tab ()
to expand that category list. A list of all 2D grid parameters in the data
source appears. When one of the fields is selected, the list of applicable
display types will be added to the Displays panel.
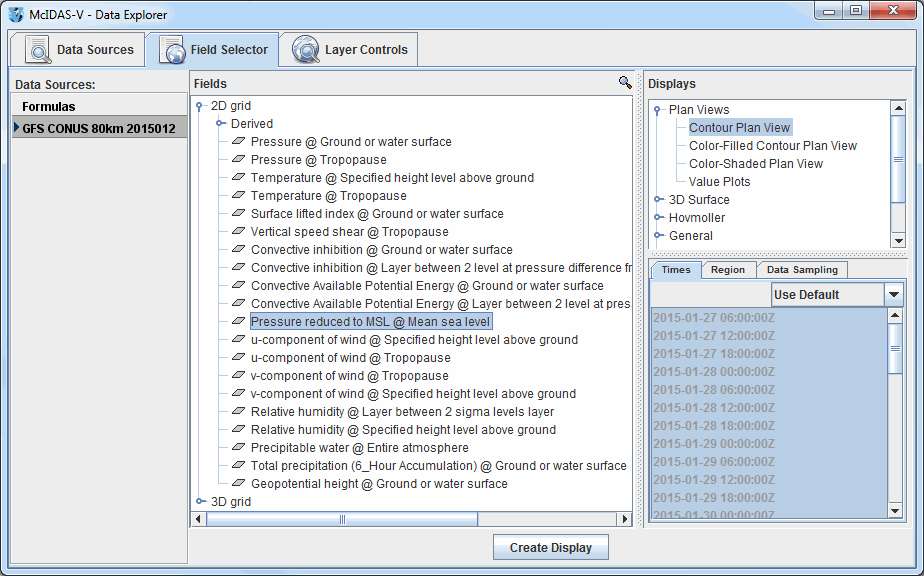
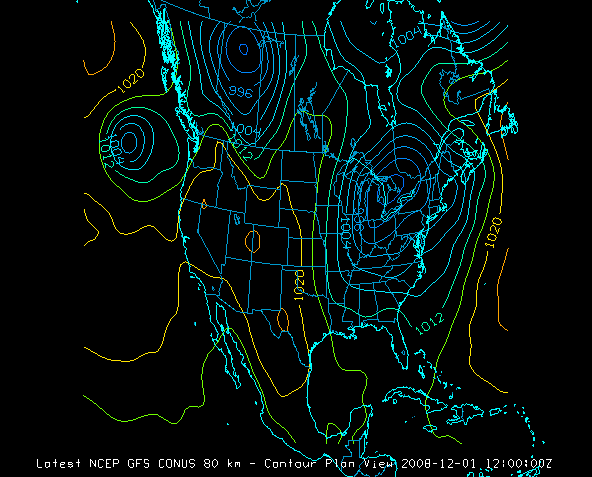
Create a Contour Plan View display of a parameter by selecting a field to display in the Fields panel and selecting Contour Plan View in the Displays panel. Click the Create Display button. The display will be created and shown in the Main Display window. The display's Legend should also be shown on the right side of the Main Display window. You can open the Layer Controls for the item by right-clicking on the name in the legend and selecting Control Window.
In the Field Selector tab of the Data Explorer, click on the 3D grid tab to expand that category. A list of all 3D grid parameters appears. To make a plot, first select a parameter name such as "Geopotential height @ Isobaric surface".
Display types suitable for this parameter are listed in then Displays panel. Select the Contour Plan View display, and click the Create Display button.
The initial plot is at the highest level in the data grid, such as 100 millibars. To shift the level to other levels:
The data in the Main Display window will now be displayed at the new level you have selected.
To zoom, pan, or rotate this 3D display, see Zooming, Panning, and Rotating. To toggle on the time animation loop, use the Run/Stop icon in the Time Animation Widget. To remove an existing display, use the File->Remove Display menu of the Layer Controls tab.
McIDAS-V automatically loads data for all times selected in the Layer Controls tab of the Data Explorer, and loads them as displays for an animation loop. Creating several displays may take time. If you only need to see one data time, it is better to only create displays for that time, as McIDAS-V will load in smaller loops of data faster than larger ones.
To make time selections that apply to all data in one data source, double click on the data source name in the Data Sources panel of the Field Selector tab to bring up the Data Source Properties editor. Click on the Times tab to subset the times.
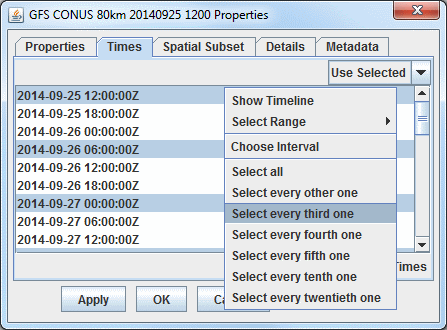
Initially, all times are selected for display, indicated by the times in this window being grayed out and the Use Default checkbox being checked. To limit the selection to fewer times than all times, first check off the Use Default checkbox, and then select the times you want by clicking on the times (Note: You can select multiple times with the Shift and Ctrl keys). The selected times will be highlighted in blue, and these are the only times that will appear in your loop of data in the Main Display window.
To make time selections for one field, use the Times tab in the lower right panel of the Field Selector tab after you select the field and before you create the display. This will override the default times for the data source selected in the Field Selector tab of the Data Explorer.
You can also spatially subset the grid using the Spatial Subset tab of the Data Source Properties. This works similar to the times subsetting where you can set the property for all fields in the Data Source or override the default for a particular field.
For more help with displaying gridded data, please see the Gridded Data tutorial on the McIDAS-V Documentation webpage.