


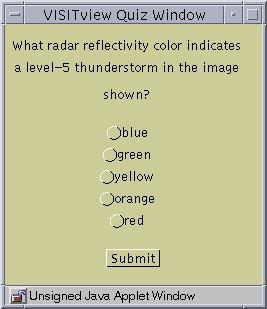
This feature of VISITview allows the instructor to do real time testing or quizzing with a VISITview lesson. One quiz question can be created for each page in a lesson. It works as follows. When an instructor, connected to the VISITview server as a "master", clicks on the quiz button, the quiz (if one exists) for the current page is loaded. The student will see a popup window with a question, at least two choices, and a Submit button, similar to the following:
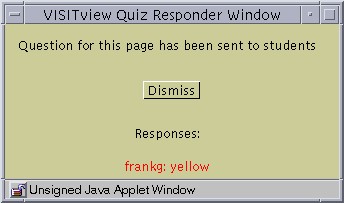
The instructor will also see a popup window, which gathers responses from the students and displays them, indicating incorrect responses with red text. This window will look similar to the following:
If no question exists for the current page, or there is a syntax error in the quiz file, the master will get a popup indicating this.
#
# Sample Quiz File
# June 1999
# created by Tommy Jasmin, SSEC
# updated: July, 2001 TMW
#
# This file is assembled as follows.  For each page the instructor would
# like to provide a quiz question, these four lines must be present:
#
#  1. page number or page label
#  2. question
#  3. choices
#  4. answer
#
# The format of each line is: the above word or words, followed by a
# colon, followed by the appropriate text for that line.  See the
# following examples below.  White space is optional, and choices must
# be comma separated (therefore, commas may not appear in the choices).
#
# The answer: string MUST be identical to at least one of the choices:
# items.
#
# The file you save MUST be named "quiz.txt" and should only be placed
# into the lesson directory of the Instructor(s).  The Lesson Builder
# does not automatically package this file (on purpose - don't want to
# show all the answers!), so you must place it manually.
#
# Formatting Notes:
#
# (1) If the question starts with a number in brackets, this is used as
# the font size for the question and answers.  For example:
#
# question: [24]What time is it
#
# would set the font size to 24pt (the default is 14pt) in the
# students' quiz windows.  This is ignored in the master's window.
#
# (2) If you just want to pop up a window with some text in it, then
# leave the "choices:" and "answer:" empty.  See example for Page 5, below.
# (Note you MUST supply them, however!)
#
# (3) If you want to force line-breaks in the displayed "question", just
# insert the sequence " \n " into the line (omit the " mark, but
# sure there is at least one blank space before and after the \n).
#
#
#-----------------------------------------------------------
# quiz info for lesson page 1
#
page number: 1
question: What radar reflectivity color indicates a level-5 thunderstorm in the image shown?
choices: blue,green,yellow,orange,red
answer: orange
#
# quiz info for lesson page 2
#
page label: National IR/radar Composite
question: There is a low pressure area centered near Indiana. (true or false)
choices: true,false
answer: true
#
# quiz info for lesson page 4
#
page number: 4
question: Given the scenario, Lake Michigan will likely be completely clear by which image?
choices: 191500,194500,201500,204500,211500
answer: 194500

#
# quiz info for lesson page 5 (this is a page just for information)
#
page number: 5
question: [30]Remember \n Check the system before pulling the plug!
choices:
answer:

#
# quiz info for lesson page 8
#
page label: Goodland
question: The storm system shown is moving at approximately what speed in MPH?
choices: 20,40,60,80
answer: 60
#
Note: this file need only be physically present on the instructor's machine. You do not have to distribute it with your lesson file, if you don't want to (this would allow some enterprising individuals access to the questions and answers). All questions and choices are sent as "commands" from the instructor's machine to the students', just like any other VISITview command. All responses are hidden from the normal logging output, however.