


This page introduces you to Version 2 of the audio and annotation recorder provided with VISITview. The purpose of this tool is to allow you to record your voice and your on-screen annotations (actually all commands like start/stop animation, zooming, moving the BRP, etc), for later playback by the students in an off-line mode.
Recording is done page-by-page. This granularity seems best for both you, the instructor, and the students who are reviewing the lesson. The interface, described below, is about as simple as possible in keeping with this approach.
Please keep in mind that this design is based on the assumption that you will not record the audio and annotations until the end of your lesson development cycle. While it is practical to re-record either (or both) the audio and annotations for a give page of the lesson, it is more difficult to insert or delete a page.
Finally, the audio is being recorded by default at about the slowest practical rate (8000 samples per second, 8-bit values, monaural) to keep the file sizes down. Even at this, however, the audio files will be about 500K bytes for every minute of audio recording! This implies, potentially, that a 45 minute session will produce audio files of about 25MB. The annotation files tend to be quite small.
You may now (in version 2) optionally save your files with 16-bit resolutation to accomodate a wider dynamic range in volume. This will double the size of your audio files, however!
Important Information - Read First!!
If you are going to record audio and annotations for an older lesson (that is one that was constructed by hand or with the Lesson Builder prior to the April, 2002, release and still has "bin/" and "lib/" directories in the lesson file), you must first Open and then Save the lesson using a newer version of the Lesson Builder, prior to recording any audio or annotations. If you have inadventantly not done this, please see Question 13 in the FAQ.
Update! Since the VISITview client code has been updated to use a newer version of the Java runtime, all recorded samples are "up-shifted" to 22.5kHz for playback. To avoid a "hissing" sound that would otherwise occur, the VISITview client and Recorder use a low-pass filter after resampling to this rate. This means that the VISITview Recorder can now produce the same audio quality as the listener/student will hear.
Please see important information, below, about this.
If you record your audio using a different tool, you must use the following sampling:
It is strongly suggested that while recording, you have no other processes running on your computer! You may even want to disconnect your machine from the network, since occasional high-priority I/O can disrupt the sampling.
Further, best results are obtained when there is little or no
background noise (voices, fans, etc.).
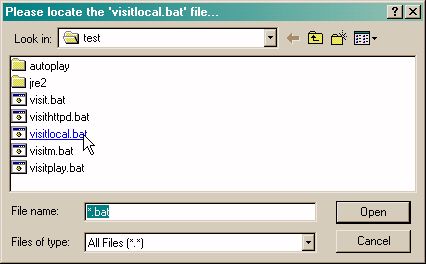
Second, switch to the directory containing the visitpack and run the file: record.bat. A Windows File Chooser dialog will appear. You must direct this dialog to the visitlocal.bat file that you used to start up the lesson. This information is used to both read the HTML control information and to locate a directory tree for use in saving the audio and annotation files (these are placed in a subdirectory named autoplay).
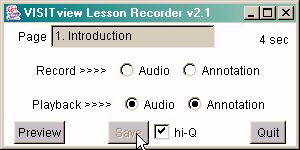
After you aim the program at the visitlocal.bat file, you will see a window like this appear:
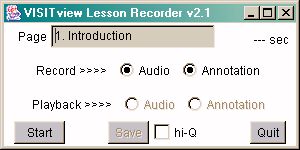
This is the main Lesson Recorder window. If any problems with
analyzing the visitlocal.bat file or the HTML it points to, a message
box will appear and the Recorder will exit.
Below this, the radio buttons for selecting whether you are recording or playing back the audio and annotations appear. When you go to a page for the first time, the radio buttons will reflect that status of whether audio and annotation recording files exist for that page. If they do not exist, the Record mode is set for both. If they do exist, then the Playback mode is set.
Across the bottom are the control buttons:
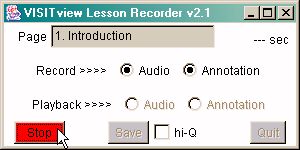
You should start talking and start annotating.
Not that the recording time will not increment until you have finished. The audio track serves as the time base for all recordings; thus, you click the red Stop button to stop the audio and annotations. Subsequent re-recordings of the annotations will cease when the end of the audio track is reached. (Note when playing back the audio and re-recording the annotations, a beep is inserted into the audio stream about a second before the end of the audio playback as a warning.)
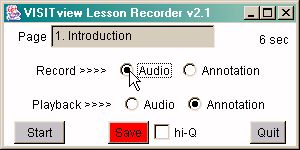
After you've finished recording, click the Stop button, and you'll see:

Here we see that 6 seconds of audio (and annotations) have been recorded. Note that the radio buttons have automatically been changed to Playback for both Audio and Annotations; thus, if you just click the Start button now, you'll hear and see what you just recorded.
In this example, I now decide that I want to re-record the audio so I click on the Record Audio radio button:
When I then click Start to begin recording, the screen changes to look like this:

When I finish recording my voice, and click Stop, the window changes to a familiar form:

At this point, I elect to save the recordings off to disk, by clicking the Save button.
Note that I can elect to save the recording with higher quality (16-bit samples) by first clicking on the hi-Q checkbox:

Remember: using the hi-Q option will double the size of your files!
Once I Save the audio and annotation files, the left most button changes its label to read: Preview.
This is so I can listen to the audio with exactly the same quality as the students will hear it. This is done by re-reading the file just written to disk. (The Preview is just like the Start -- it causes the playback to begin; the label only changes to remind me.)
It is strongly recommended that you do this when not using hi-quality mode, so that you can detect overmodulation and correct it quickly.
Now then... if instead of saving the modified files, I had tried to change pages in the Lesson window before saving the updated files, a dialog would appear:
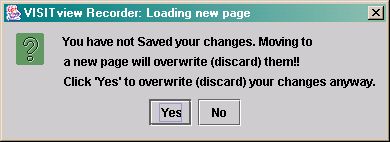
I can choose to change pages (and lose the recorded audio and/or annotations) or not to. Note if I pick No the Recorder will not changes pages, but that the Lesson window has already changed. In this case, the audio and annotations apply to the page named in the Recorder window, not the one in the Lesson window. You may return the Lesson window to the page the Recorder is working on by simply playing back the audio & annotations for the page.
After saving the updated data, it's time to move on to the next page. I can always return to Page 2 later and redo anything that needs to be changed.
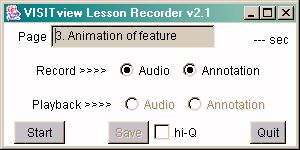
Back in the VISITview session, I simply select the next page to work with (by using any of the means available to show a different page). When that happens, the page name will appear in the window:
When you are finished with the recordings, you'll want to repackage your lesson files to include the audio and annotation recordings. The easiest way to do this is to run ZIP directly to repackage all your lesson files.
Audio streams may get quite large, and so you might consider just ZIPping the audio/annotations and have the users download and install these separately.
Important Note: if you later re-edit the lesson using the Lesson Builder, you will have to recopy the contents of the autoplay directory, since it is not automatically re-written by the Lesson Builder.
Here's the way to use ZIP to repackage both the audio+annotations separately, or your entire lesson:
If you are using a Unix-based computer, you may run this command from your lesson directory that contains the autoplay directory (with your annotations and recorded audio files):
The students would then put the newly created ZIP file into a new directory and unzip it there. The complete lesson, which can be used for interactive teletraining or stand-alone playback, is then available.
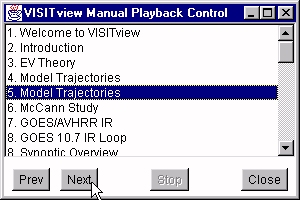
They can then control the lesson playback as desired. The Prev and Next buttons step backward and forward one page. They may also just click on a Page Label, and the playback will start for that page. After the playback starts, it will continue automatically.