


VISITview tutorial
June, 2002
(This section added in June, 2005)
Automatic Recording of Audio and Annotations
This page introduces you to the Automatic audio and
annotation recorder provided
with VISITview. The purpose of this tool is to allow you to record
your voice and your on-screen annotations (actually all commands like start/stop
animation, zooming, moving the BRP, etc), for later playback by the students
in an off-line mode. Note this differs from the "page-by-page" audio and annotation
recorder (click here) in that it is designed for
recording "live" sessions.
Recording is still done page-by-page, but the Automatic Recorder will
automatically save the page files whenever the instructor moves along to the "next page"
of the lesson.
Finally, the audio is being recorded by default at about the slowest
practical rate (8000 samples per second, 8-bit values, monaural)
to keep the file sizes down. Even at this, however, the audio
files will be about 500K bytes for every minute of audio
recording! This implies, potentially, that a 45 minute session
will produce audio files of about 25MB. The annotation files
tend to be quite small.
After you have completed recording a session using the Automatic Recording program,
you can go back and re-record audio and/or annotations for any of the pages by using
the "page-by-page" recorder.
Starting the Automatic Recorder
- First start your lesson, using one of the "convenience batch files" contained in the saved lesson file
(e.g., "visitlocal.bat" or "visitm.bat", etc.)
- Next, start the automatic recorder using the autorecord.bat file, or click on the
Start->Program Files->VISITview Lesson Builder->Automatic Recorder.
- A "file dialog" will appear. Find the .bat file you started your lesson with in #1 and click on it.
This is very important since the Automatic Recorder reads these files to obtain information about the lesson
(server, group, etc).
- The Automatic Recorder window will appear.
- When you are ready to start recording, click the "Start" button. The recording will not start until a page has
been loaded (if one is already loaded when you click "Start" the recording starts immediately).
- When you have finished, click the "Quit" button. The current page's recordings will be written to disk and the
window will close.
During the recording session
You may click the Pause button any time. To start the recording back up, click the Resume button.
If you do not restart the recording, and the instructor goes to a page that has not been previously recorded,
the pause will be cancelled, the page's files will be written, and a new file opened for the new page.

During the automatic recording, the software will make only this assumption:
If the instructor returns to a previously-recorded page, the recording continues for
the original page's file.
If the instructor moves to a page that has not been previously recorded, the software will write the current page's
audio and annotation files to disk and then start new files for the newly selected page.
Summary of Controls and Status display
- Status shows the status of the Automatic Recording program: waiting, recording, paused, etc.
- Page shows the Page Label from the page currently being viewed (the page being recorded is
indicated in the Status text box).
- Start/Pause/Resume button:
- Initiallly Start is shown - click to start recording
- During recording, the button is labelled Pause - click to pause/suspend the recording
- After you "pause" a recording, the button is re-labelled Resume - click to resume recording
- Quit button. Click this when you are finished recording. The information for the last page will be
written to disk and the window will close.
Troubleshooting
- As always, we recommend that you stop all other applications on your workstation (except for the VISITview
lesson, of course) before attempting to record.
- Please refer to the tutorial page on Audio Recording
for information about setting volume levels. Since there is no "Preview" in this Automatic Recorder,
it is important to test beforehand to get the levels set correctly.
- If there are connection problems with the server, the Automatic Recorder will attempt to reconnect (just as the
VISITview client does).
- Please be certain you are writing to a local filesystem and not one that is remotely mounted or shared
- If there are other problems, messages may appear in the "Console Window" (aka the DOS Prompt Windows) that might
be helpful in resolving problems.
Re-packing your lesson
When you are finished with the recordings, you'll want to
repackage your lesson files to include the audio and annotation
recordings. The easiest way to do this is to run ZIP directly to
repackage all your lesson files.
Audio streams may get quite large, and so you might consider
just ZIPping the audio/annotations and have the users download
and install these separately.
Important Note: if you later re-edit the lesson using the
Lesson Builder, you will have to recopy the contents of the
autoplay directory, since it is not automatically
re-written by the Lesson Builder.
Here's the way to use ZIP to repackage both the audio+annotations
separately, or your entire lesson:
- From within the directory where you have installed the
'visitpack' (and from which you run the Lesson Builder),
run one of the following batch files:
- If you want to ZIP up the entire lesson (the typical case):
mkrepack.bat
This is the program that is run from the Windows Start menu "Repack Audio Lesson".
The students would then put the newly created ZIP file into a new directory
and unzip it there. The complete lesson, which can be used
for interactive teletraining or stand-alone playback, is then
available.
- If you just want to ZIP up only the audio and annotations
which can then be installed on top of an existing lesson:
mkaudzip.bat
The students would then put this into the same directory
as the lesson and unzip it right there. Since the
pathname "autoplay" is entered
into the ZIP file, the unzipped data will be placed into the
correct subdirectory on the students' machines. And since
they previously installed the rest of the lesson, it can still be
used for teletraining.
In either case, you will be prompted to enter the name of the ZIP file to store
the audio and annotations into. NOTE: this ZIP file
must be put into your lesson directory and not
the autoplay directory where your audio and annotation
files are all located.
- Running either batch file will ZIP up any updated .class files, the
visitplay.bat file, and all the files in your lessons
"autoplay" directory. The first batch file (mkrepack)
also ZIPs up the rest of the lesson files.
The Student's View
When the student gets your updated lesson, they install it in the
usual manner. When they want to play it back, however, they use
the command:
visitplay.bat
This command starts the client, the server, and the playback
dialog:
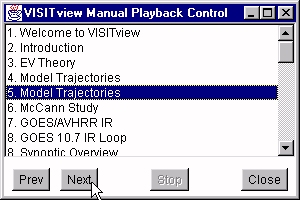
They can then control the lesson playback as desired. The
Prev and Next buttons step backward and forward one
page. They may also just click on a Page Label, and the playback
will start for that page. The playback will continue to progress through
the pages automatically.
To return to the start of the tutorial, please
click here.
To return to the VISITview Home Page, please
click here.