


VISITview tutorial
June, 2002
Using overlays
This page will show you how to make use of overlays. An
overlay is another image that is placed on top of the background
image. Usually, much of this image contains a color level that has
been assigned to "transparent", so that the underlying (background)
image can show through. An excellent example of this is putting radar
data on top of a satellite image. The radar image's background color,
for example: black (red=0, green=0, blue=0), is identified as the
tranparency color, and so when the radar image is overlaid on top of
the background (satellite) image, the satellite image will show
through to the student everywhere there are no echoes.
You may use more than one overlay on a page of your lesson. Keep in
mind that each overlay, however small the file on disk is, will still
take up memory equivalent to the image dimension (width x height) times 4 bytes
on the student's computer.
Overlay images are brought into your lesson just like images for Pages
and Portals. We'll not detail the process again, so if you need
review of that, please click here to go back
to the second page of this tutorial.
- To work with Overlays, you must first bring the images into your
lesson. First, click on the View Overlays button.
- Browse Directories and locate the sample images
overlay1.jpg, overlay2.jpg, and overlay3.jpg.
- Put these three files into your lesson as a single overlay
with 3 frames (similar to what you did for the portals --
remember you will have to switch to View Overlay Frames to put
the 2nd and 3rd file into the lesson (as frames 2 and 3 of the
overlay).
- When you have put them into your lesson, the screen should look
like this:

Don't forget to type in a label for the overlay!!
- Click the View Pages button to return to Page View.
- Select Page #2 (by clicking on it's thumbnail).
- Click on the Select Overlays button, and a window
will pop up that shows the first frame of Page 2 and looks like this:
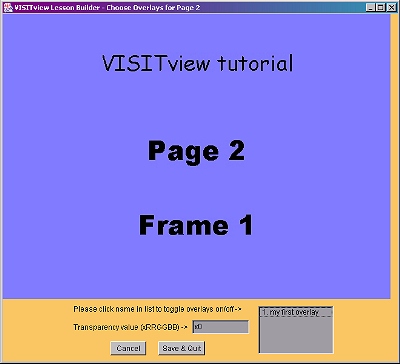
- Note the following controls:
- The list of your overlays in the box on the lower right (should
have just one entry)
- The "Cancel" and the "Save & Quit" buttons -- just like in the
Portal View.
- The "Transparency value (xRRGGBB) just above those buttons.
- A line of text just about the Transparency line -- this will show
hints & tips.
- First, click on your overlay (named in the List box)
- You will see the first from of your overlay (should say "Overlay
1" and have a white background).
- Locate the text input box next to the "Transparency value.."
label, and type into that box:
xFFFFFF
then press the "enter" key. Your display will change to look like
this:
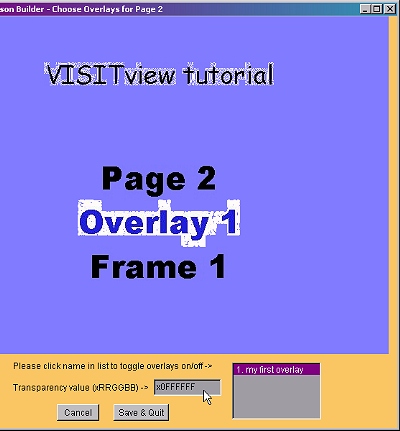
We have just changed the value for the 'transparent color' from black
(x000000) to white (xFFFFFF). Those of you familiar with editting
HTML, will find this nomenclature similar to what is used there. For
everyone:
- the 'x' is required to indicate hexadecimal value
- the value FF is decimal 255 -- the brightest value you
can have in the 8-bit world.
- there are 3 such values: one each for red, green and
blue in that order.
- for example: xFF8000 means red = 255, green = 128, blue = 0.
- you may enter the alphabetic values in either upper or lower case.
- Each time you change the transparency value, the display changes
immediately. NOTE: You may only have a single transparency value for your
entire lesson!
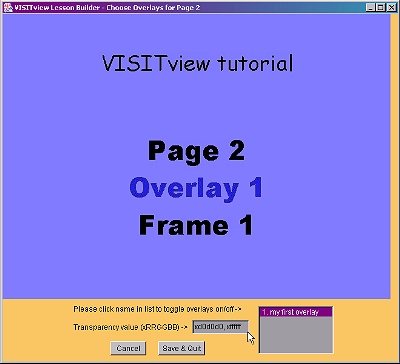
- For some images (like the JPEG ones in this example), you may need a range of values. For example:
xd0d0d0 , xFFFFFF -- try using this and see how it improves the "not
quite white" pixels in our overlay image.
- When you're done, click on the Save & Quit
button
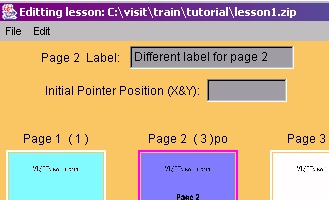
- Back in the main window, you'll notice that above the thumbnail
for Page 3, it now says: Page 2 (3)po indicating that this
page has both a portal and an overlay.
When you're ready to learn about saving your lesson, please
click here.
To return to the VISITview Home Page, please
click here.